Flower Crown Eevee


  • 首页

  • 归档

  • 分类

  • 标签

  • 搜索

Use Kinect on Firefly-RK3399

发表于 2017-05-20 | 分类于 Tech

Preparation

Install libfreenect

Note:
  libfreenect for Kinect Xbox 360
  libfreenect2 for Kinect Xbox One

1
2
3
4
5
6
7
8
9
10
11
12
13
14
15
16
17
18
19
20
21
22
23
24
25
26
27
28
29
# download latest code, instead of latest release v0.5.5
$ git clone https://github.com/OpenKinect/libfreenect.git
$ cd libfreenect/
# fix issue with OpenCV, in line 173
$ vi OpenNI2-FreenectDriver/src/DepthStream.hpp
case XN_STREAM_PROPERTY_ZERO_PLANE_DISTANCE: // unsigned long long or unsigned int (for OpenNI2/OpenCV)
if (*pDataSize != sizeof(unsigned long long) && *pDataSize != sizeof(unsigned int))
{
LogError("Unexpected size for XN_STREAM_PROPERTY_ZERO_PLANE_DISTANCE");
return ONI_STATUS_ERROR;
} else {
if (*pDataSize != sizeof(unsigned long long)) {
*(static_cast<unsigned long long*>(data)) = ZERO_PLANE_DISTANCE_VAL;
} else {
*(static_cast<unsigned int*>(data)) = (unsigned int) ZERO_PLANE_DISTANCE_VAL;
}
}
return ONI_STATUS_OK;
# build
$ mkdir build
$ cd build
$ cmake -DBUILD_OPENNI2_DRIVER=ON ..
$ make
# preview
$ ./bin/freenect-glview
阅读全文 »

Build OpenCV on Firefly-RK3399

发表于 2017-05-17 | 分类于 Tech

Install

Required Packages

1
2
3
4
5
6
7
# compiler ✓
$ sudo apt-get install build-essential
# required ✓
$ sudo apt-get install cmake git libgtk2.0-dev pkg-config libavcodec-dev libavformat-dev libswscale-dev
# optional ✓
$ sudo apt-get install python-dev python-numpy libtbb2 libtbb-dev libjpeg-dev libpng-dev libtiff-dev libjasper-dev libdc1394-22-dev

Getting OpenCV Source Code

1
2
3
$ git clone https://github.com/opencv/opencv.git
$ cd opencv/
$ git checkout 3.2.0

If use extra modules:

1
2
3
$ git clone https://github.com/opencv/opencv_contrib.git
$ cd opencv_contrib/
$ git checkout 3.2.0

Building OpenCV from Source

阅读全文 »

Headless Firefly-RK3399 Setup

发表于 2017-05-10 | 分类于 Tech

Firefly-RK3399

Flash Image

Windows:

  1. Download here, 或这里
    • Ubuntu 16.04 image: Firefly-RK3399_Ubuntu16.04_201703181519.img
    • RK Tool: AndroidTool_Release_v2.38.rar
    • RK USB driver: DriverAssitant_v4.5.rar
  2. Install RK USB Driver

    • Run “DriverAssitant_v4.5/DriverInstall.exe”

      install-rk-usb-driver.png
  3. Connect device to host

    1. Connect the power adapter to board.
    2. Use Type-C cable to connect host and device together.
    3. Press and hold RECOVERY key.
    4. Shortly press RESET key.
    5. After around two seconds, release RECOVERY key.

      阅读全文 »

Screen Sharing from Ubuntu to Mac

发表于 2017-05-09 | 分类于 Tech

Ubuntu

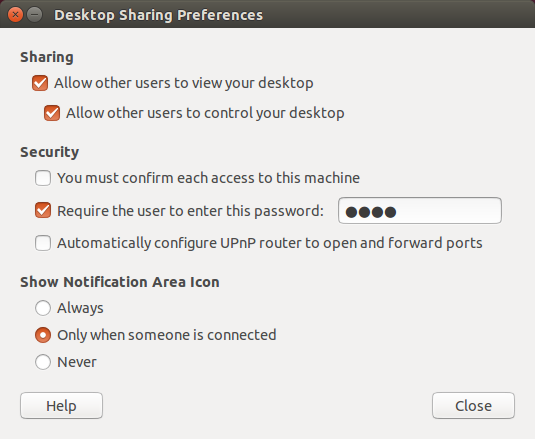
1) Open “Desktop Sharing” and setup,

desktop-sharing.png

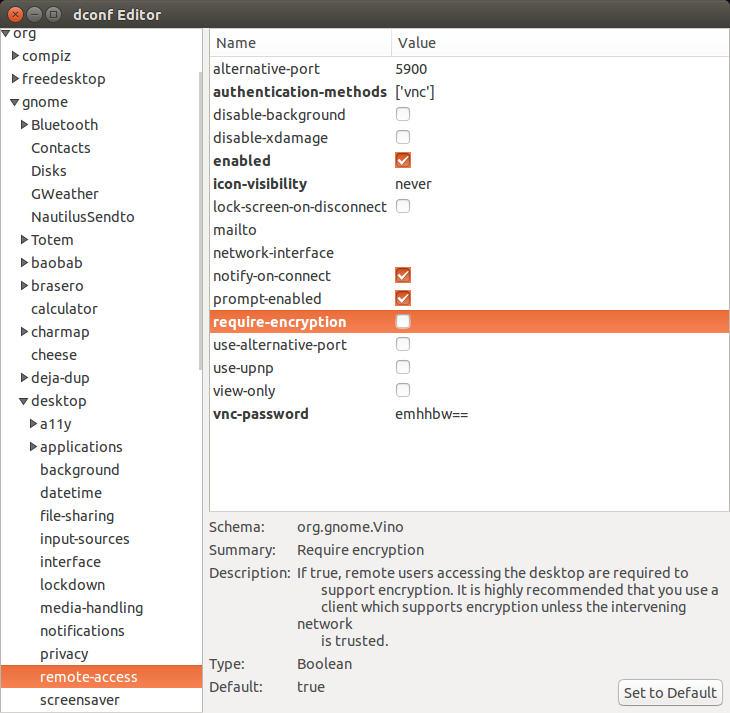
2) sudo apt-get install dconf-tools and run dconf-editor,

dconf-editor.png

Or,

1
2
$ export DISPLAY=:0
$ dconf write /org/gnome/desktop/remote-access/require-encryption false

Mac

1) Spotlight Search “Screen Sharing” and connect to,

阅读全文 »

Headless Raspberry Pi Setup

发表于 2017-05-09 | 分类于 Tech

Install

  1. Download “RASPBIAN JESSIE LITE” without PIXEL desktop.
  2. Unzip it to get the image file (.img) for writing to your SD card.
  3. Setup headless settings, if don’t have an extra keyboard or HDMI cable.

    1. Add “ssh” file to the SD card root. Then boot your Pi.
    2. Connect it to the router with wire. Then get its ip from the router.
    3. Use SSH to connect to your Pi.
      • ssh pi@<IP>, password: raspberry.
    4. Configure your Pi.
      • sudo raspi-config
    5. Setting WIFI up and reboot wireless.

      • sudo vi /etc/wpa_supplicant/wpa_supplicant.conf

        1
        2
        3
        4
        5
        6
        network={
        ssid="ssid"
        psk="password"
        priority=1
        id_str="home"
        }
      • sudo reboot

    6. Setting static ip.
      • ifconfig
      • sudo nano /etc/dhcpcd.conf
        1
        2
        3
        4
        # Custom static IP address
        interface wlan0
        static ip_address = 192.168.1.121/24
        static routers = 192.168.1.9
  4. Writing the image to the SD card, see the guide for your system:

    • Linux
    • Mac OS
    • Windows
阅读全文 »

Build OpenCV for Android with CUDA

发表于 2017-05-05 | 分类于 Tech

Prerequisites

  • Ubuntu 14.04 LTS
    • Download here
  • NVIDIA CodeWorks for Android 1R4
    • Doc here
    • Download here
    • Could only select actions: CUDA ToolKit 7.0, CUDA for Android 7.0
  • Android Studio
    • Add C and C++ Code to Your Project

Prepare

1
2
3
4
5
6
7
8
9
10
11
12
13
14
15
16
17
18
19
20
# Set environment variables
$ vi ~/.bashrc
# Android SDK & NDK
export ANDROID_SDK=$HOME/Android/Sdk
export ANDROID_NDK=$ANDROID_SDK/ndk-bundle
export ANDROID_STANDALONE_TOOLCHAIN=$ANDROID_NDK/toolchains
export PATH=$PATH:$ANDROID_SDK/tools:$ANDROID_SDK/tools/bin:$ANDROID_SDK/platform-tools:$ANDROID_NDK
# Java SDK 1.8 (could ignore, for latest android command-line tool)
export JAVA_HOME=$HOME/Develop/jdk1.8.0_131
export PATH=$JAVA_HOME/bin:$PATH
$ source ~/.bashrc
# Enable OpenCV Java wrappers
$ sudo apt-get install ant
# Downgrade android command-line tool
$ cd $ANDROID_SDK
$ mv tools/ tools-backup/
$ curl -O https://dl.google.com/android/repository/tools_r25.2.3-linux.zip
$ unzip -q tools_r25.2.3-linux.zip

Build

阅读全文 »

Use ccache, distcc, dmucs to accelerate builds

发表于 2017-05-05 | 分类于 Tech

ccache

ccache is a compiler cache. It speeds up recompilation by caching previous compilations and detecting when the same compilation is being done again. Supported languages are C, C++, Objective-C and Objective-C++.

Mac:

1
2
3
4
5
6
7
8
9
10
11
12
13
14
15
16
17
18
# install
$ brew install ccache
# where
$ brew ls ccache
$ which ccache
$ brew info ccache
# env
$ vi ~/.bash_profile
export PATH=/usr/local/opt/ccache/libexec:$PATH
# verify
$ source ~/.bash_profile
$ which clang
/usr/local/opt/ccache/libexec/clang

Ubuntu:

阅读全文 »

Install Caffe & TensorFlow with Python and CUDA (macOS)

发表于 2017-04-12 | 分类于 Tech

Requirements

Python Installation

pyenv

1
2
3
4
5
6
7
$ brew install pyenv
$ pyenv install --list
$ pyenv install anaconda3-4.3.1
$ pyenv global anaconda3-4.3.1
$ pyenv versions
system
* anaconda3-4.3.1 (set by /Users/John/.pyenv/version)

Enable pyenv in your shell:

1
2
3
$ vi ~/.bash_profile
# eval "$(pyenv init -)"
$ exit
1
2
3
4
5
6
$ python --version
Python 3.6.0 :: Anaconda 4.3.1 (x86_64)
$ pip --version
pip 9.0.1 from /Users/John/.pyenv/versions/anaconda3-4.3.1/lib/python3.6/site-packages (python 3.6)
$ conda --version
conda 4.3.14

CUDA Installation

阅读全文 »

使用 Djinni 开发 Android, iOS 共享库

发表于 2016-05-06 | 分类于 Tech

Djinni 是一个用来生成跨语言的类型声明和接口绑定的工具,主要用于 C++ 和 Java 以及 Objective-C 间的互通。

此文,将介绍如何使用 Djinni 开发 Android, iOS 的共享库。这会带来几个好处:

  • 用了接口描述文件。声明清晰、修改简易,并保证了跨平台接口的一致性。
  • 自动生成接口绑定代码。免去了绑定 C++ 和 Java (JNI) 及 Objective-C (Objective-C++) 的麻烦。

初见:Djinni 及其样例

下载 Djinni

1
$ git clone https://github.com/dropbox/djinni.git

编译 Djinni

1
2
$ cd [djinni_root]/
$ src/build

于[djinni_root]/src/support/sbt.resolvers.properties内可添加镜像源。

  • sbt下载慢?

使用 Djinni

阅读全文 »
Eevee

Eevee

9 日志
1 分类
21 标签
RSS
GitHub Twitter
© 2017 Eevee
由 Hexo 强力驱动
主题 - NexT.Mist